
Ik wilde eens een stoel maken. Zo eentje om lekker een krantje in te lezen of een kopje koffie in te drinken - een fauteuil. Ik zocht op internet wat plaatjes op van stoelen met een houten frame en gebruikte één plaatje daarvan als basis, waaraan ik nog wat kleine aanpassingen deed.
I've always wanted to make a chair. One of those for reading a newspaper or drinking a cup of coffee - an armchair. I looked up some pictures of chairs with a wooden frame on the internet and used one picture as a base, to which I made some minor adjustments.

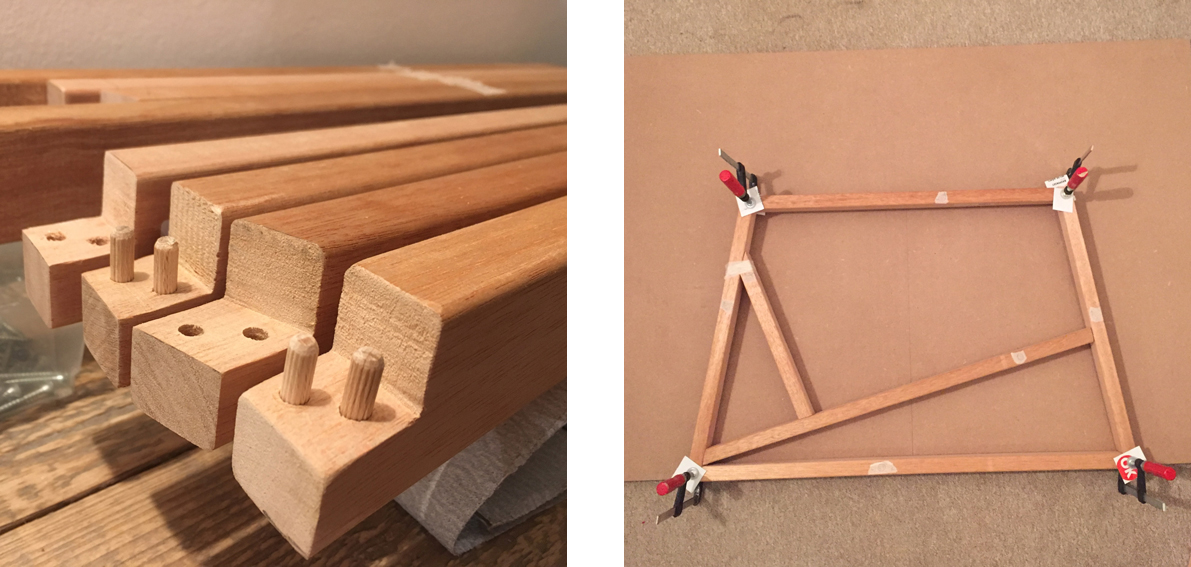
Ik kocht hardhout en deuvels bij de bouwmarkt. Voor de stevigheid wilde ik 'half-houtse' verbindingen gebruiken. Een stukje inzagen en dan met een beitel heel voorzichtig een hoekje eruit slaan.
I bought hardwood and dowels from the hardware store. For firmness I wanted to use 'half-wood' connections. Saw a piece and then carefully chisel out a corner with a chisel.

Om de gaten precies recht tegenover elkaar te krijgen, zodat de deuvels precies goed terechtkomen, is nog wel een dingetje. Gelukkig ontdekte ik het bestaan van 'deuvel-hulpjes': eerst boor je de gaten aan de ene kant, dan die zwarte puntjes erin. En als je dan de latjes tegen elkaar drukt, komen er deukjes precies op de plek waar je in het andere latje moet boren!
It's hard to get the holes exactly opposite each other, so that the dowels end up just right. Fortunately, I discovered the existence of 'dowel aids': first you drill the holes on one side, then you insert those black dots. And when you press the slats together, there will be dents exactly where you have to drill in the other slat!

Nadat alle deuvels op de goede plek terecht waren gekomen, lijmde ik de delen aan elkaar met houtlijm. Op een houten plaat had ik de contouren getekend, zodat ik kon controleren of alle verbindingen precies onder de goede hoek uit zouden harden. Voor deze hele stoel zijn dus núl schroeven gebruikt. Alleen deuvels en lijm.
After all the dowels ended up in the right place, I glued the parts together with wood glue. I drew the contours on a wooden plate, so that I could check whether all joints would harden at exactly the right angle. So no screws were used for this entire chair. Only dowels and glue.
Dit werden dus de twee zijkanten van de stoel. Natuurlijk even mooi in de lak zetten en daarna - ook met deuvels - de dwarsverbindingen erin. Ik was zelf vooral zeer tevreden over hoe de half-houtse verbindingen eruit zagen, nadat ik ze geschuurd en gelakt had:
So these became the two sides of the chair. Of course, just paint it nicely and then - also with dowels - the cross connections. I was especially pleased with what the half-wood joints looked like after I sanded and varnished them:

Oké, het frame was nu klaar. Maar ik wilde heel graag de héle stoel zelf maken, dus ook de kussens en bekleding. Anders kun je niet zeggen dat je zelf een stoel hebt gemaakt. Daarom kocht ik bij Jan Sikkes van die schuimblokken.
Okay, the frame was ready now. But I really wanted to make the whole chair myself, including the cushions and upholstery. Otherwise I could not say that I made a chair myself. That is why I bought those foam blocks from [Jan Sikkes].

En bij een meubelstoffeerder kocht ik mooie paarse meubelstof. Het betekende natuurlijk wel dat ik de hoezen voor die schuimblokken zelf moest naaien. Gelukkig had ik al een beetje ervaring met de naaimachine.
And I bought beautiful purple furniture fabric from a furniture upholsterer. Of course it meant that I had to sew the covers for those foam blocks myself. Fortunately, I already had a bit of experience with the sewing machine.

De schuimblokken pasten mooi in de hoezen en de laatste paar naden moesten even met de hand dichtgenaaid worden. In de hoes van de rugleuning stopte ik trouwens een stukje triplex bij het schuimblok in en dit kussen maakte ik met klittenband aan het houten frame vast, zodat de rugleuning niet kantelt als je er tegenaan leunt.
The foam blocks fitted nicely into the covers and the last few seams had to be sewn shut by hand. In
the backrest cover, by the way, I tucked a piece of plywood into the
foam block and I attached this cushion to the wooden frame with Velcro,
so that the backrest does not tilt when you lean against it.

En toen was de stoel helemaal klaar! Het was een mooi proces, waarbij ik gaandeweg allemaal dingen bijleerde, maar het is goedkoper om een stoel bij de IKEA te kopen - dat moet ik er eerlijk bij zeggen. En ja: hij zit héérlijk!
And then the chair was all set! It
was a nice process, during which I gradually learned all kinds of
things, but it is cheaper to buy a chair at IKEA - I have to say that
honestly.
And yes: it's very comfortable!

Ich finde der Stuhl sieht großartig aus und so einfach zu bauen.
BeantwoordenVerwijderenToll,
Allerdings habe ich eine Frage, wie bequem ist dein stuhl?